
How to Create A Gold Ring Wreath For Any Season
- humblehavenblog

- Dec 4, 2017
- 2 min read
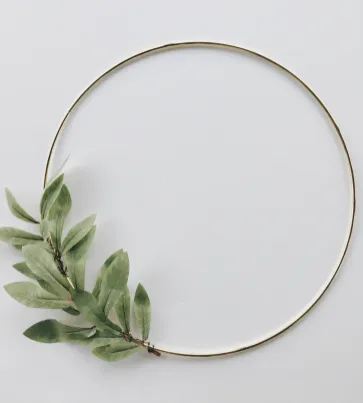
Holiday Gold Ring Wreath
Happy Holidays Everyone! This post is all about those gold ring wreaths that you have been seeing everywhere this year! I think they are so versatile and easing to swap out for any time of year!
The wreath I will be making today is geared towards the Holiday season. However if you want a more fall oriented wreath, the steps are the same just choose some fall foliage instead of winter plants. Same idea goes for Spring and Summer.
This project is more time consuming than it looks. It also depends on how detailed you want your wreath to be. I went really simple with mine, feel free to add more if you like!

Supplies Needed:
10" or 14" Gold Ring (depending on how big you want your wreath - I used the 14")
Plants - real or fake, again this is your preference. I was going for longevity so I opted for fake plants. I went with Olive leaves (or Eucalyptus), I used the dark leaves from the roses, some red berries and some branches from a Christmas tree.
A couple white roses - I got all of the faux plants at Michaels.
Floral wire or string - I found both at Michaels craft stores.
Wire cutters/ floral cutters.
TIP: You can opt for faux greenery if you do not have fresh available.

Step 1:
Trim the plants and flowers so they are at a manageable length to attached to the wire ring.

Step 2:
Layout the plant pieces you have trimmed and lay them on the gold ring. Don't be afraid to play around here, try different layouts until you get one that you absolutely love!

Step 3:
Start attaching each piece to the gold ring. I ended up using floral wire - it worked great - but I ended up poking myself quite a few times (Floral string may be easier to use, especially when attaching the flowers at the end).
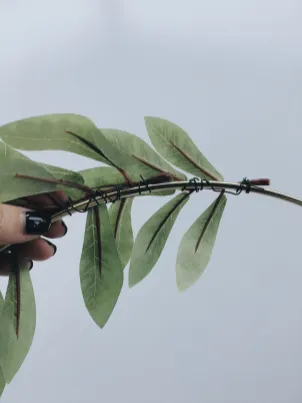
I went layer by layer, starting with the light green olive leaves and then adding in the darker leaves for contrast. The flowers were the last on the list so I could really focus on how I wanted to arrange them to be symmetrical. Fan out the leaves and flowers to make sure they are evenly space around the circle.

Step 4:
You are done! Hang up that beautiful wreath. Take some photos and don't forget to tag @myhumblehaven so I can see your lovely creations.


Comments